
Microbit Robot Challenge
Road Safety
Purpose
Emphasis should be placed on
- Introduction to the use of the Microbit in relation to a Robot
- Coding the Microbit Robot
- Controlling variables of
- Speed and Time to determine Distance and Direction
- Reusing code
- Defining functions
- Learning by doing
- Competing in teams
- 21st century skills
Equipment
- Road Safety Mat
- Microbit Robot – per group
- Computer / Laptop / Cell Phone
- Installed / access to Makecode for Microbit
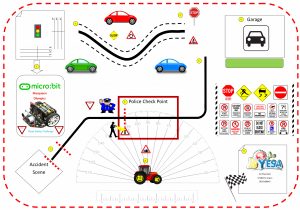
General Instructions
- Teams are to start in the top left hand corner and move a block into the designated area indicated
- Either use
- Line following or
- Straight line to point 3
- Stop at the pedestrian crossing
- Visit your friend by parking in the Garage and pausing for 5 seconds
- Follow the road to the Police Checkpoint
- Your lights and sensors will be checked
- LEDs
- LED Screen
- Under vehicle lights
- Light Level sensor
- Follow the road but unfortunately you have an accident as you bump into a solid wall.
- Display the accelerometer sensor reading at point of impact
- Use your emergency LED to warn other traffic of the dangerous situation
- A vehicle has broken down in the middle of the road and needs to be pushed into the destination point 9.
- Park within the designated finish area to complete the challenge.
Calibration
A ruler and a protractor have been printed onto the maps. This may assist the teams in calibrating their Robots, as each team may use different variables of Speed and Time which will affect distance and angles.
Adding fun coding elements
- The Microbit should Display the team number as T1, T2, T3, etc. as the first command.
- Arrows for movement on the LED Display
- ↑ Forward
- ↓ Reverse
- ← Left turn
- Left LED Flashes 4 times
- → Right Turn
- Right LED Flashes 4 times
- Reverse beep as a warning when reversing
- Completion sound once task is completed